


Table of contents


No headings in the article.
Introduction: In today's digital landscape, cloud computing has become an integral part of businesses, offering scalability, flexibility, and efficiency. Amazon Web Services (AWS) stands out as a leading cloud platform, providing a wide range of services to meet diverse business needs. One crucial aspect for managing users, groups, and devices is the implementation of Directory Services in AWS. In this blog post, we will walk you through the basics of setting up and managing Directory Services in AWS in a simple and easy-to-understand way.
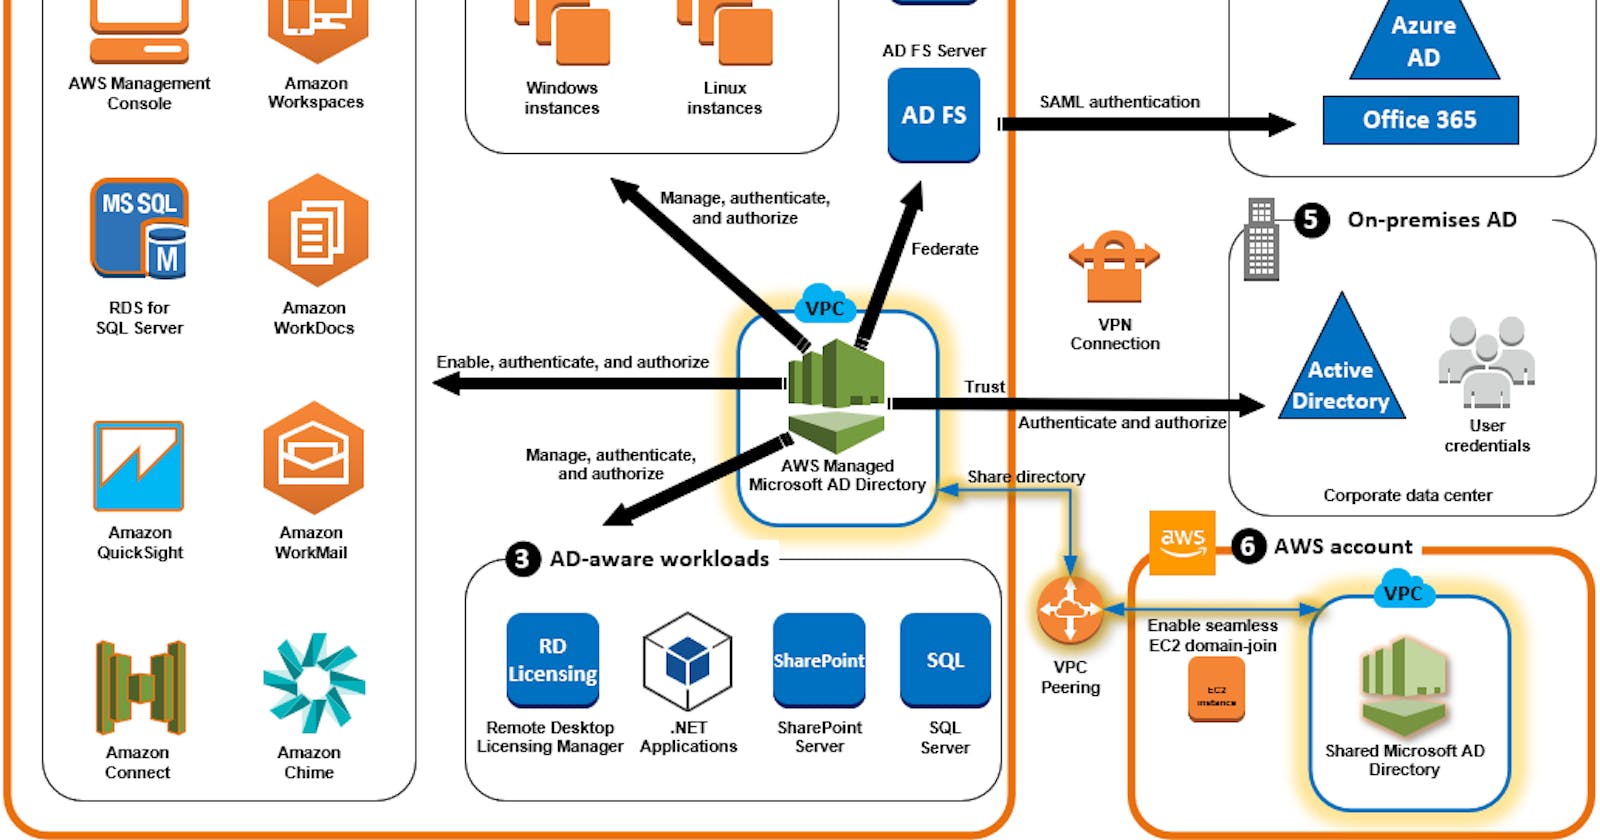
Understanding Directory Services: Directory Services play a pivotal role in managing identities and access within an organization. It provides a centralized repository for storing and organizing information about users, groups, and devices. In AWS, you have the option to use AWS Directory Service, which supports both Microsoft Active Directory and Simple AD. For simplicity, we'll focus on setting up Simple AD.
Step 1: Accessing AWS Directory Service:
Log in to your AWS Management Console.
Navigate to the AWS Directory Service.
Step 2: Create a Simple AD Directory:
Click on the "Create Directory" button.
Choose the "Simple AD" option.
Specify the directory details, such as directory name, domain name, and a directory size based on your organization's needs.
Set up the VPC details or choose an existing VPC.
Configure additional options like DNS, Directory VPC settings, and Directory size.
Review your configuration and click on "Create Simple AD."
Step 3: Configure Networking and Security:
Ensure that your VPC and security groups are appropriately configured to allow communication with the Simple AD.
Update your DNS settings as per the information provided in the AWS Directory Service Console.
Step 4: Launch EC2 Instances:
Launch EC2 instances within the same VPC as your Simple AD.
Configure the instances to join the Simple AD domain during the launch process.
Step 5: Validate Simple AD Setup:
Log in to the EC2 instances using Remote Desktop Protocol (RDP) or SSH.
Verify that the instances are part of the Simple AD domain by checking their system properties.
Step 6: Manage Users and Groups:
Navigate to the AWS Directory Service Console.
Click on the "Directory" that you created.
In the "Directory details" tab, select "Users and groups" to manage user accounts and groups.
Step 7: Implementing Multi-Factor Authentication (MFA):
Access the AWS Directory Service Console.
Choose your Simple AD directory.
Under "Directory details," select "Multi-Factor Authentication."
Follow the prompts to enable MFA for users.
Conclusion: Implementing Directory Services in AWS, specifically Simple AD, provides a centralized and efficient way to manage identities within your organization. By following these easy steps, you can establish a robust directory infrastructure to support user authentication and authorization seamlessly. As you explore AWS further, consider additional features and integrations that enhance your directory services to meet the evolving needs of your business. Happy cloud computing!